Thursday, February 19, 2009
Jewelry Making goes to Facebook

Thursday, January 8, 2009
Tools of the Trade
Reading written instructions might be difficult when it comes to techniques. It is easier to watch and learn.
There is this awesome video on making a bracelet. While I don't have time to make it, if you guys are free, you can give it a shot.
I have found a video on the tools that we need for jewelry making. So you guys can take a look. It is really useful and helpful for newbies.
Monday, December 1, 2008
Metal Washer Necklace

My friend and I went around hardware stores hunting for metal tap washers to make a necklace (see below).
After making it, I had a lot of leftovers. Not wanting to waste them, I began brainstorming on what to make. I made a bracelet by connecting smaller washer with jump rings. (I have no idea where it went, so no pictures of it. Sorry.) I also made a simple necklace with the bigger washers.

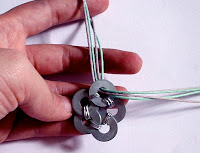
But what I loved most was a flower pendant I made. It is really easy and looks very sweet.
As usual, here's what you need.
Wire of any size and colour, depending on your preference; metal washers and a wire cutter.
Instructions

1) Arrange the metal washers in a pattern you like.
2) Take two of the washers and using the wire, go through the hole in the first one and
then the second. Bring it back round and wind it a few times. Make sure it is taut.
3) Repeat step 2 for the rest until you have what you want. Use the wire to go round again for extra security and cut the wire.
4) Take two cords of different colours and fold it in half.

5) Take the loop and string it through one of the washers.


6) Take the one half of the cord and string it through the loop of the other end. Pull it taut.
7) Take both ends of the cord and wrap it around your neck and knot it.
Try and experiment with different washers and patterns. Do send me a picture of your pendant. :D
I still have extra washers though. I think my next project would be this. They make metal washers look different, more like pieces of jewellery. Can't wait to get started.
Thursday, November 27, 2008
Friendship Band Earrings


Get some strings, earring hooks, wire hoops and pliers. You can get them at Beadspin behind Tampines MRT station.
Instructions

If my instructions are not clear enough, you might want to check this out. Just modify it a little, instead of wrapping round another string, it's the wire hoop.
Maybe you could give it to your friends as the alternative friendship band. :D
Monday, November 17, 2008
The Science of Knit Wristbands
 While practicing, I had an idea to make wristbands. It allowed me to carry out some experiments too. I wanted to know if the size of the finished product would differ between the wool and ribbon. So I knitted 28 rows of 10 stitches. The wool piece was shorter than the ribbon. That wasn't a surprise given that the width of the ribbon is twice that of wool.
 I also tried stretching them. They were the same size. So since the wool piece is shorter, wool has more elasticity. That was established earlier when I first started knitting with ribbons, but I wanted to confirm that.
 So then I made wristbands out of both materials. As you can see, the ribbon one looks nicer and you can see the pattern of the stitch. However, it was a really tight fit. :( The wool one was looser but also more plain. I think I could jazz it up with beads and sequins. What do you guys suggest?
For instructions on making wristbands, check this out. They have very simple and clear instructions.


